Scene Editor – Buildbox 3 Manual

By |

Scene Editor

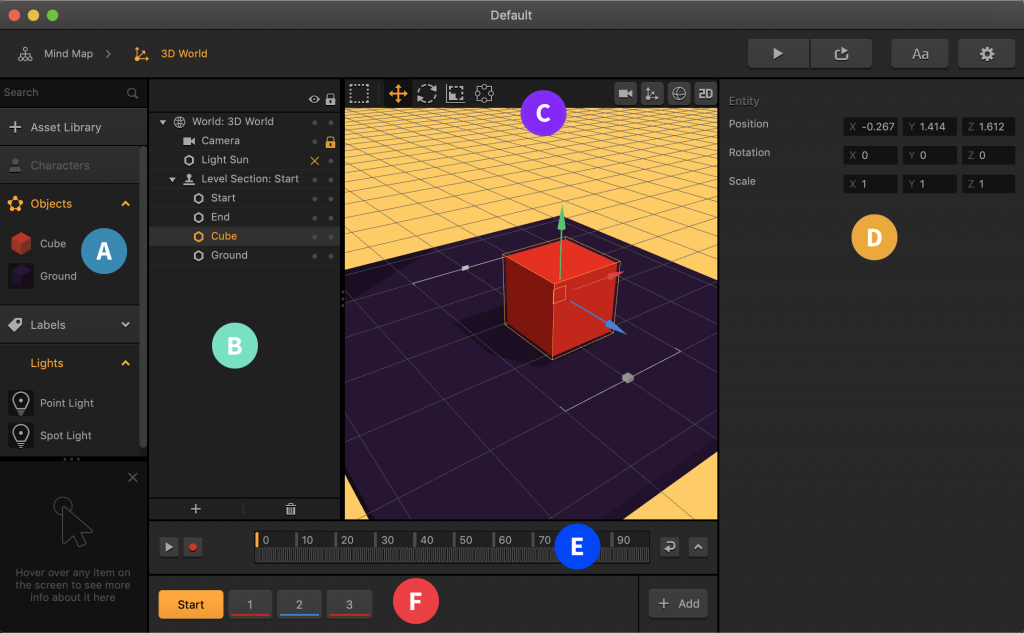
To access the Scene Editor, double-click a purple 3D World node on the Mind Map or click the Edit icon in the top right corner of the node.

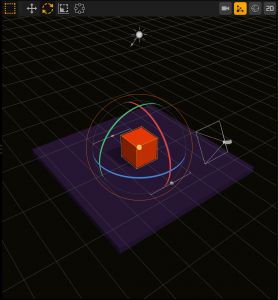
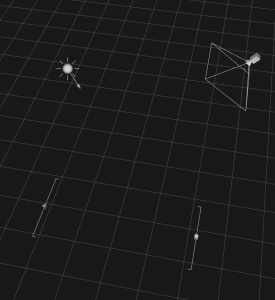
This editor allows you to add assets and lights to a scene as well as adjust the game path and camera. By default, every scene includes a camera, a source of light, and a set of start and end points of the current scene.

There are several important Follow camera attributes, such as Follow Position, Rotation, Offset, and others, that you need to define to make the camera move around as desired in your game. For details, see Camera Attributes.

You may also watch the Light Sun and the Camera View videos.

Navigating in the Scene Editor

To zoom or change the 3D view in the Scene Editor, you can use the View options on the Buildbox Menu Bar, which also include a special set of View options available only in the Scene Editor or the keyboard shortcuts below.

Standard Navigation

The controls below allow you to rotate and pan the view around the scene.

Shortcut Keys Description
Spacebar + Left-click + Drag Move your view in any direction.
Spacebar+ Right-click + Drag Rotate your view in any angle
Scroll up Zoom your view in
Scroll Down Zoom your view out.
F Center your view on the selected object
Fly Navigation

The controls below allow you to point your view in any direction, as well as control the movements of your camera with your keyboard.

Right-click + Description
+ Drag Look around the scene
+ W Move your view into the direction you are currently facing.
+ A Move your view to the left
+ S Move your view backward
+ D Move your view to the Right
+ Q Move your view Up
+ E Move your view Down

Working in the Scene Editor

  • To add scenes, click Add in the Scene Selector at the bottom or duplicate an existing ones.
  • To add assets, drag them from the Asset panel on the left.
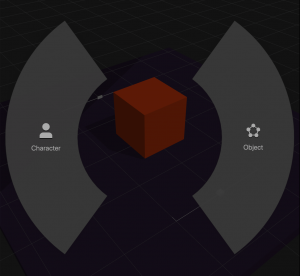
    If you drag an outside file to the Editor, for example, with an image you want to add to the scene, a Drop Wheel appears that allows you to set the new asset as a character or an object.
Depending on your zoom level and other settings, you may not always see all the objects in the scene. To check what’s added to the current scene, look at the list in the Outliner. To see more of the current scene, you may also change the Render Distance settings on the Editor tab of the Project Settings.
  • To delete an object from a scene, select and press Delete on the keyboard.
  • To duplicate an object, press D on the keyboard.
  • To modify or view the camera, light, or other object attributes, select the object and use the respective Options panel.
  • To move or resize objects, you can manipulate them directly on the grid using the axis handles or enter the appropriate numeric values in the corresponding entity attributes in the Options panel. You can also use the position, rotation, scale, and other tools at the top. For details, see Tools.
  • To change the camera view or to open the Collision Shape Editor, use the toolbar buttons at the top. For details, see Toolbar Buttons.

World Workspace – Buildbox 3 Manual

By |

World Workspace

To go inside a 3D World and start building it, double-click a purple 3D World node on the Mind Map or click the Edit icon in the top right corner of the node. This opens the workspace of the selected world.

Inside a World, you can add scenes to your game level and build them, using objects, characters, and other assets.

The first default Start scene is always displayed in the Scene Selector (F) at the bottom. You may not delete, solo, or mute this scene, but you can duplicate it, if needed. For details, see Scene Selector.

The World workspace has all the parts described in detail in General Workspace Overview. For specific details on each part of the World workspace, see the links below:

Image Options – Buildbox 3 Manual

By |

Image Attributes

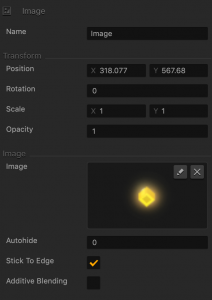
To add an image to a UI screen, see Adding Images. To see the attributes of an image, select it in the UI Editor or the Outliner and use the Options panel on the right.

Option Description
Name Enter a custom name for the image, if needed. It will be displayed in the Outliner.

TIP: Don’t leave this field blank, as you won’t be able to tell what object or image it is if you hide it.

Position Enter the appropriate values for each axis to specify a precise position for the image on the screen.

TIP: You can also drag the image to the desired location directly in the UI Editor.

Rotation Enter a degree value to specify the rotation angle of the image.
Scale Enter a value for each axis to make the image as proportionally large, or wide or narrow as needed.

TIP: You can also select the image in the UI Editor and drag its corner handles to resize it as needed.

Opacity Enter a value from 0 to 1 to specify the transparency of the image. For example, if you enter .5, the image will be semi-transparent.
Image The preview of the image you’ve added. To replace or edit the image, click the Edit icon to display the Sprite Editor.
Autohide If you want the image to appear momentarily and then fade away, specify the number of seconds for the image to be displayed for before disappearing.

To keep the button displayed on the screen, enter 0.

Stick to Edge Select this checkbox to maintain button’s relative size and position when scaling the screen for different sizes.
Additive Blending Select to add a glow effect overlay to any graphics or 3D objects underneath the image.


Label Options – Keeping Score – Buildbox 3 Manual

By |

Score Label Attributes

Drag a label to the Scene Editor or UI Editor from the Asset Panel or click one that is already there and use the following attributes to a special text area that will display the player’s score during a game session. See also Adding Score.

Option Description
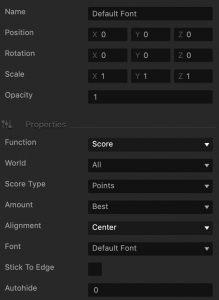
Name Change the name of the text area label so that you can identify it in the project, for example, Game Score. By default, it is the name of the font you’ve selected.

To change the actual font type, use the Font field.

Don’t leave this field blank, as you won’t be able to tell what object it is if you hide it in the Outliner.
Position Enter the appropriate numeric values for each axis to define the location of the text area. Alternatively, drag the arrow axis handles to the desired location in the Scene Editor. If needed, for details, see Tools.
Rotation Enter the appropriate numeric values for each axis to define the angle of the text area. Alternatively, click the Rotation Tool button and drag the circle axis handles to set the desired angle for the text area in the Scene Editor. If needed, for details, see Tools.
Scale Enter the appropriate numeric values for each axis to define the size of the text area. Alternatively, click the Scale Tool button and drag the cube axis handles to set the desired size for the text area in the Scene Editor. If needed, for details, see Tools.
Opacity Enter a value from 0 to 1 to specify the transparency of the text on the label, where 1 equals 100% opacity and 0 indicates full transparency.
Function Select a function for the label:

  • User Text—Displays the text you enter on the screen. If you select this option, skip the attributes below and define the rest of the options as described in Text Area Attributes.
  • Score—Displays the game score.
World To have the score displayed throughout all game levels, select All. Otherwise, select the Current World.
Score Type To keep track of collected game points, select Points. If you are using coins in the game, select Coins.

Make sure you have an asset added to your game with the Collision Group attribute set to Coin. See Asset Attributes. See also Adding Score.
Amount Select what amount of collected points or coins to display as the game score:

  • Best
  • Current
  • Total
Alignment Select the score text alignment.
Font Select a font you’ve added using the Font Editor. To add a font, click the Font Editor button on the Navigation bar.
Stick to Edge Select this checkbox to keep the relative size and position of the text when scaling the screen for different sizes.
Autohide If you want the text to appear momentarily and then fade away, specify the number of seconds for the text to be displayed for before disappearing. To keep the text displayed on the screen, enter 0.


Label Options – Text – Buildbox 3 Manual

By |

Text Label Attributes

Drag a label to the Scene Editor or UI Editor from the Asset Panel or click one that is already there and use the following attributes to define the text you want to appear in the game.

Option Description
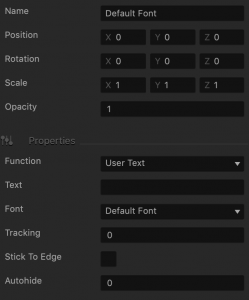
Name Change the name of the text area label so that you can identify it in the project. By default, it is the name of the font you’ve selected.

To change the actual font type, use the Font field.

Don’t leave this field blank, as you won’t be able to tell what object it is if you hide it in the Outliner.
Position Enter the appropriate numeric values for each axis to define the location of the text area. Alternatively, drag the arrow axis handles to the desired location in the Scene Editor. If needed, for details, see Tools.
Rotation Enter the appropriate numeric values for each axis to define the angle of the text area. Alternatively, click the Rotation Tool button and drag the circle axis handles to set the desired angle for the text area in the Scene Editor. If needed, for details, see Tools.
Scale Enter the appropriate numeric values for each axis to define the size of the text area. Alternatively, click the Scale Tool button and drag the cube axis handles to set the desired size for the text area in the Scene Editor. If needed, for details, see Tools.
Opacity Enter a value from 0 to 1 to specify the transparency of the text on the label, where 1 equals 100% opacity and 0 indicates full transparency.
Function Select a function for the label:

  • User Text—Displays the text you enter in the field below.
  • Score—Displays the game score. Skip the attributes below and define the rest of the options as described Score Attributes.
Text Type the text that you want to be displayed on the screen.
Font Select a font you’ve added using the Font Editor. To add a font, click the Tools > Font Editor on the Buildbox menu bar.
Tracking Enter the number of pixels to adjust the spacing between the characters in the text.
Stick to Edge Select this checkbox to keep the relative size and position of the text when scaling the screen for different sizes.
Autohide If you want the text to appear momentarily and then fade away, specify the number of seconds for the text to be displayed for before disappearing. To keep the text displayed on the screen, enter 0.

Point Light Options – Buildbox 3 Manual

By |

Point Light Attributes

A point light is an additional source of light in a game that projects light within a given range or diameter.

A scene can only have a maximum of 7 lights.

To view the point light attributes in the Options panel:

  1. Inside a World, drag the point light from the Lights section in the Asset panel to the Scene Editor.
  2. Click the point light in the Scene Editor or select it in the Outliner.

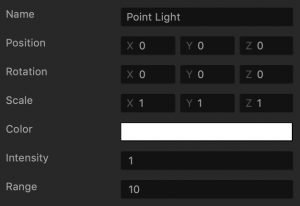
Option Description
Name Change the name of the light object, only if needed.
Position Enter the appropriate numeric values for each axis to define the location of the light. Alternatively, drag the arrow axis handles to the desired location in the Scene Editor. If needed, for details, see Tools.
Rotation Enter the appropriate numeric values for each axis to define the angle of the light. Alternatively, click the Rotation Tool button and drag the circle axis handles to set the desired angle for the light in the Scene Editor. If needed, for details, see Tools.
Scale Enter the appropriate numeric values for each axis to define the size of the light. Alternatively, click the Scale Tool button and drag the cube axis handles to set the desired size for the light in the Scene Editor. If needed, for details, see Tools.
Color Click this field, select the desired light color from the several options provided in the Colors window, and click OK.
Intensity Enter a numeric to specify the strength or amount of light produced by the light source. The higher the number, the more light will be shed.
Range Enter a numeric value to specify how far the light should be projected.

Adding Score – Buildbox 3 Manual

By |

Add Game Score

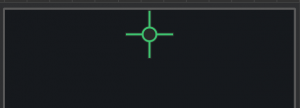
A score counter in a game is basically a text area defined to keep count of the player’s points and automatically display it in the UI. Unlike a regular text label, in the UI Editor, a score label is displayed as green crosshairs at the top of the screen:

To add a score counter to the game:

  1. On the Mind Map, double-click the UI node where you want to add a score.
    The UI Editor is displayed.
  2. In the Asset panel, expand the Labels section and drag the font label you want to use for the score to the UI Editor.
  3. Position the text area at the top of the screen or wherever you want the score to appear.
  4. In the Options panel on the right, do the following:
    1. In the Name field, enter a descriptive name, for example, Score.
    2. In the Function field, select Score.
    3. Make the rest of the selections to choose the score type, amount, and other attributes as described in Score Label.
  5. Preview the game to test the score.

Changing Collision Shapes – Buildbox 3 Manual

By |

Change Collision Shapes

A collision shape is the surface area around an object that gets affected when two objects from different collision groups collide.

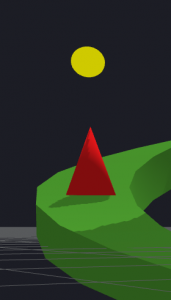
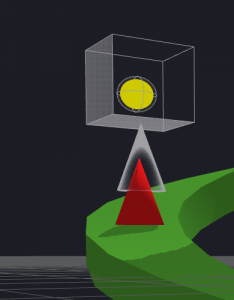
For example, even though it looks like the ball in the image on the left can clearly make it over the cone obstacle, it will actually collide with it. If you click the Collision Shape Editor button in the scene, you will see in the image on the right that the cubic collision shape of the ball will graze the top of the conic collision shape of the obstacle. If not, see Viewing Collision Shapes.


Here’s what you need to know about collision shapes:

  • A collision shape may be the same physical shape as the object or be of different shape, for example, a cone can have a cylinder collision shape.
  • You can expand a collision shape in size, as if to add padding to the object, typically to increase the collision surface of the object.
  • You can also move a collision shape away from the object.

Thus, when two assets collide, for example, when a character runs into an obstacle, it is their collision shapes that get affected, not the objects themselves.

Step-by-Step Instructions

To change a collision shape of an asset:

  1. On the Mind Map, double-click the World node where you want to change a collision shape of an asset.
    The Scene Editor is displayed.
  2. On the toolbar, click the Collision Shape Editor button.
  3. Select the asset in the scene.
  4. In the Options panel on the right, in the Collision Shape field, select the shape you need.
    • Cube
    • Sphere
    • Cylinder
    • Mesh—A sophisticated shape, with outer and inner vertices created to reflect the shape details, such as a hole in a torus, for example, which would let objects go through it during a collision.
    • Hull—A “solid” shape that reflects only the outer frame of the selected shape, without details such as a hole in a torus, for example. No objects can go through a Hull collision shape.
  5. If you select Mesh or Hull, in the Collision Mesh field that appears below, click the Edit icon and select the appropriate shape from Mesh Manager and click Save.
To preview the collision shapes, turn on the Debug Mode in the Preview window.

Adding Enemies – Buildbox 3 Manual

By |

Create Enemies

An enemy is an asset that can harm a character, typically during a collision.

To create an enemy in a game:

  1. On the Mind Map, double-click the World node where you want to add an enemy.
  2. Inside the World, click Asset Library.
  3. On the Shapes tab, double-click the shape you want to make a character in your game.
  4. Click Asset Library to close it.
  5. In the Asset panel, under Objects, select the shape you’ve just added.
  6. In the Options panel on the far right, do the following:
    1. (Optional) In the Name field, type Enemy after the shape name.
    2. In the Collision Group, select Enemy.
  7. If needed, change the collision shape of the enemy.

You’ve added an enemy to your game.