Animation Node – Buildbox 3 Manual

By |

Animation Node

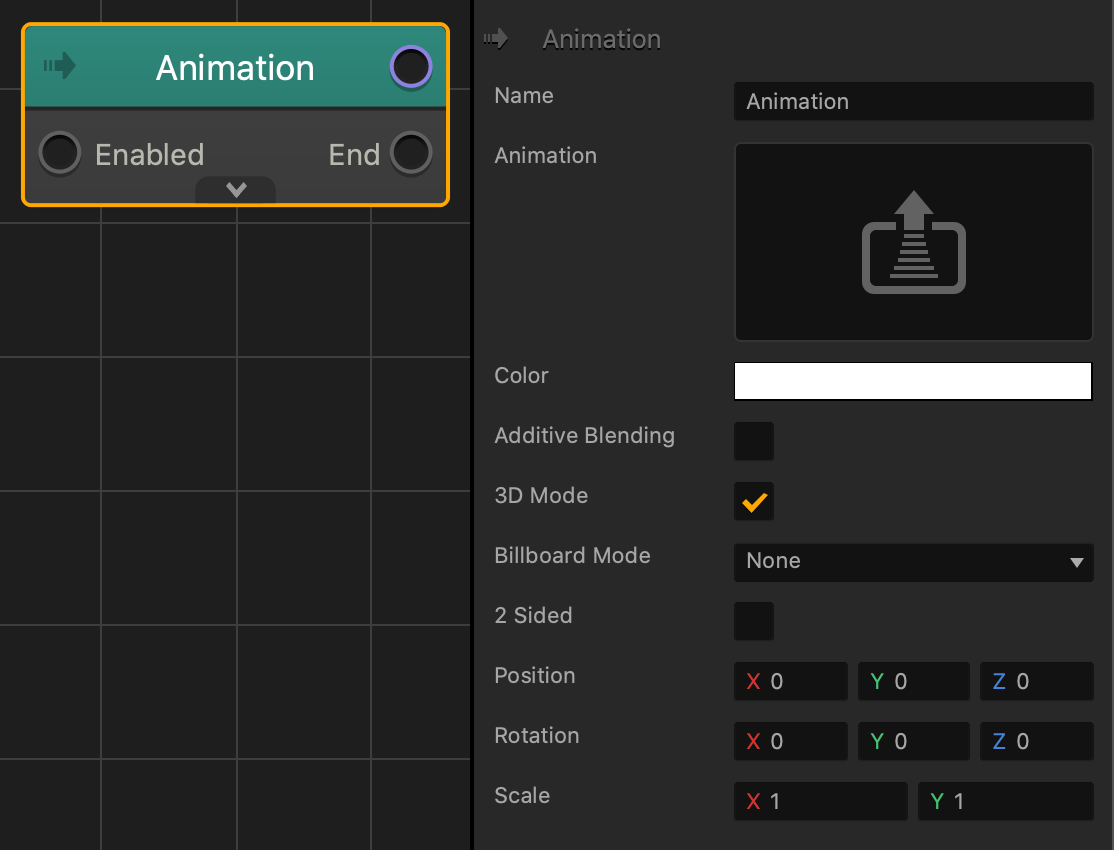
This content node creates a 2D plane that plays a PNG sequence or displays an image.

Option Description
Name Type a custom name for this node, if you have many of the same types of nodes.
Animation To add a PNG sequence, drag all PNG images associated with that sequence to this area.

To edit the properties of a PNG sequence, click the Edit icon in the top-right corner to open the Animation Editor.

Color Click the color field to change the color of the asset.

If the Animation attribute as an image attached, this attribute will apply a color overlay on top that image.

Additive Blending Select to make the image (or animation) add a glow effect to any graphics or 3D models objects underneath it.
3D Mode Select to show the Billboard Mode attribute. Clear to hide the Billboard Mode attribute
Depth Order Enter a numeric value to determine which animation node will be placed on top if there are multiple animation nodes in this asset’s node map.
Billboard Mode Select an option to determine how the image automatically faces the camera in the game:

  • Point—the image will change its rotation in the game to always point towards the camera.
  • Plane—keeps the image aligned with the camera view at all times.
2 Sided Select to show the image on both sides of the plane.
Position To offset the position of the 3D model, enter the appropriate X, Y, or Z axis values.
Position To move the 2D plane without moving the entire asset, enter the appropriate X, Y, or Z axis values.
Rotation To rotate of the 2D plane without rotating the entire asset, enter the appropriate X, Y, or Z axis values.
Scale Enter a numeric value in the X and Y axis fields to change the size of the image.

3D Model Node – Buildbox 3 Manual

By |

3D Model Node

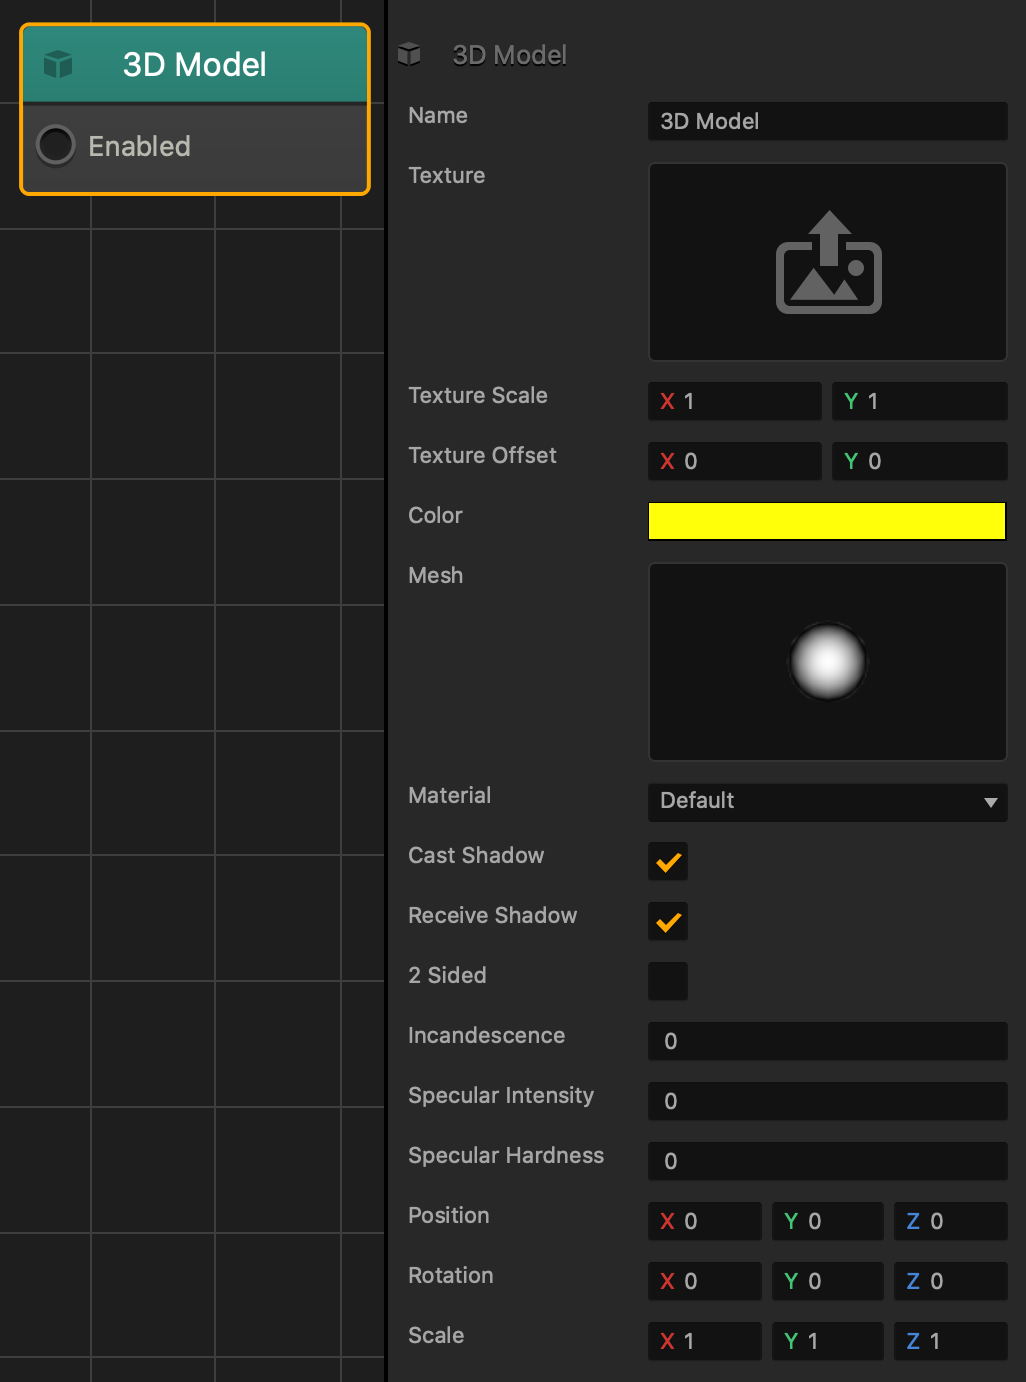
This content node defines a 3D mesh that provides a shape to your character or object.

If a 3D model contains more than 50,000 polygons, some polygons will not be displayed.

Option Description
Name To create a custom name, type it here.
Texture To apply an image to the surface of a 3D model, drag a JPG or PNG image file into the texture area.

To edit the image attributes, mouse over the field, click the Edit icon , and use the Sprite Editor.

Texture Scale To adjust the size of the texture, enter different X and Y axis values.
Texture Offset To move and offset the texture in a specified direction, enter different X and Y axis values.
Color To apply a color to the mesh, click the color bar. In the Colors window, select a new color and click OK.

If a texture has been applied to the model, the color will be applied on top of the texture based on the Opacity value in the Colors window.
Mesh To apply a different mesh to the 3D model, mouse over the field and click the Edit icon . In the Mesh Manager, select a new mesh from the list and click Save.
Material Choose material for the mesh:

  • Default— allows light to reflect off the surface and contains the Specular Intensity and Specular Hardness attributes, described below.
  • Shadeless—does not interact with light and does not contain any specular attributes.
Blending This option appears when you add a PNG image that has an alpha channel or transparency.

  • Disabled—removes the transparency and fills the empty area with a solid black color.
  • Alpha Premultiplied—makes the alpha affect the entire image and brighten it.
  • Alpha Non Premultiplied—makes the alpha affect only the transparency.
  • Additive—applies a slight transparency to the entire image.
Cast Shadow Click this checkbox to allow the 3D model to cast a shadow on the surface of other 3D models.
Receive Shadow Click this checkbox to allow other 3D models to cast shadows on the surface of this 3D model.
2-Sided Select this checkbox to make each side of the 3D model have 2 sides, making the inside of the model hollow.

For example, by default, a plane has only one visible side, while the other side is completely transparent. This option makes both sides completely visible.
Incandescence Enter a numeric value to specify the brightness of the mesh surface.
Specular Intensity Enter a numeric value to specify how much light is reflected from the surface of the mesh. The higher the value, the more light will be reflected from the mesh surface.
Specular Hardness Enter a numeric value to specify the transparency of the light reflection edges from the mesh.
Position To move and offset the 3D model so that it’s not placed at the center of the asset, enter the appropriate X, Y, or Z axis values.
Rotation To rotate of the 3D model without rotating the entire asset, enter the appropriate X, Y, or Z axis values.
Scale To change the size of the 3D model, enter the appropriate X, Y, or Z axis values.

Advanced Nodes – Buildbox 3 Manual

By |

Advanced Nodes

These nodes add advanced functionality and logic to an asset.

For details on how to add an advanced node to a character or object in a game, see Adding, Editing, and Deleting Nodes.

Node Icon Description
Texture Scroller Applies continuous movement to the textures on the surface of all 3D Models attached to the asset.
State Machine This node will keep only one input active at a time. Each input and output row represents a single state. When the input of one state is active, the other inputs of other states will immediately become inactive.
Remove Removes the asset from the World during gameplay.
Script Allows you to create a custom node in JavaScript.
Delay Delays the activation of the next node by the number of seconds specified.
Global Counter Keeps count of how many times this node has been activated, and once it has been activated by the amount of times specified by the Target amount, the Trigger output will activate any connected nodes.
Logger Creates a log entry that could be found in the Script Logs Panel inside the Preview Window.
Stick to Edge Maintains an asset’s position and size in relation to the screen size.

Monetization Nodes – Buildbox 3 Manual

By |

Monetization Nodes

This page has been updated for the 3.4.1 beta.


These nodes specify when ad videos or banners are displayed, and allow the user to make purchases with the game.

For details on how to add a monetization node to a character or object in a game, see Adding, Editing, and Deleting Nodes.

Node Icon Description
Rewarded Video Ad Plays a video ad that will activate any nodes once the video is finished playing.
Purchase Processes a purchase using a bundle ID. Once the purchase is successful, any nodes connected to the “End” output will be activated.

Rewarded Video

A rewarded video is an optional full-screen, skippable video that players can watch in exchange for a non-liquid, in-app reward after viewing the entire ad. Examples of rewards are: access to new levels, an extra life, continued play, points, coins, or something else without monetary value, depending on the asset nodes you connect to the Reward output.

By default, this node will utilize Buildbox’s easy ad monetization solution to play a rewarded video ad. For details on adding ads to your game, see Ad Monetization.

Option Description
Name Type a custom name for this node, if needed, for example, the name of the video.

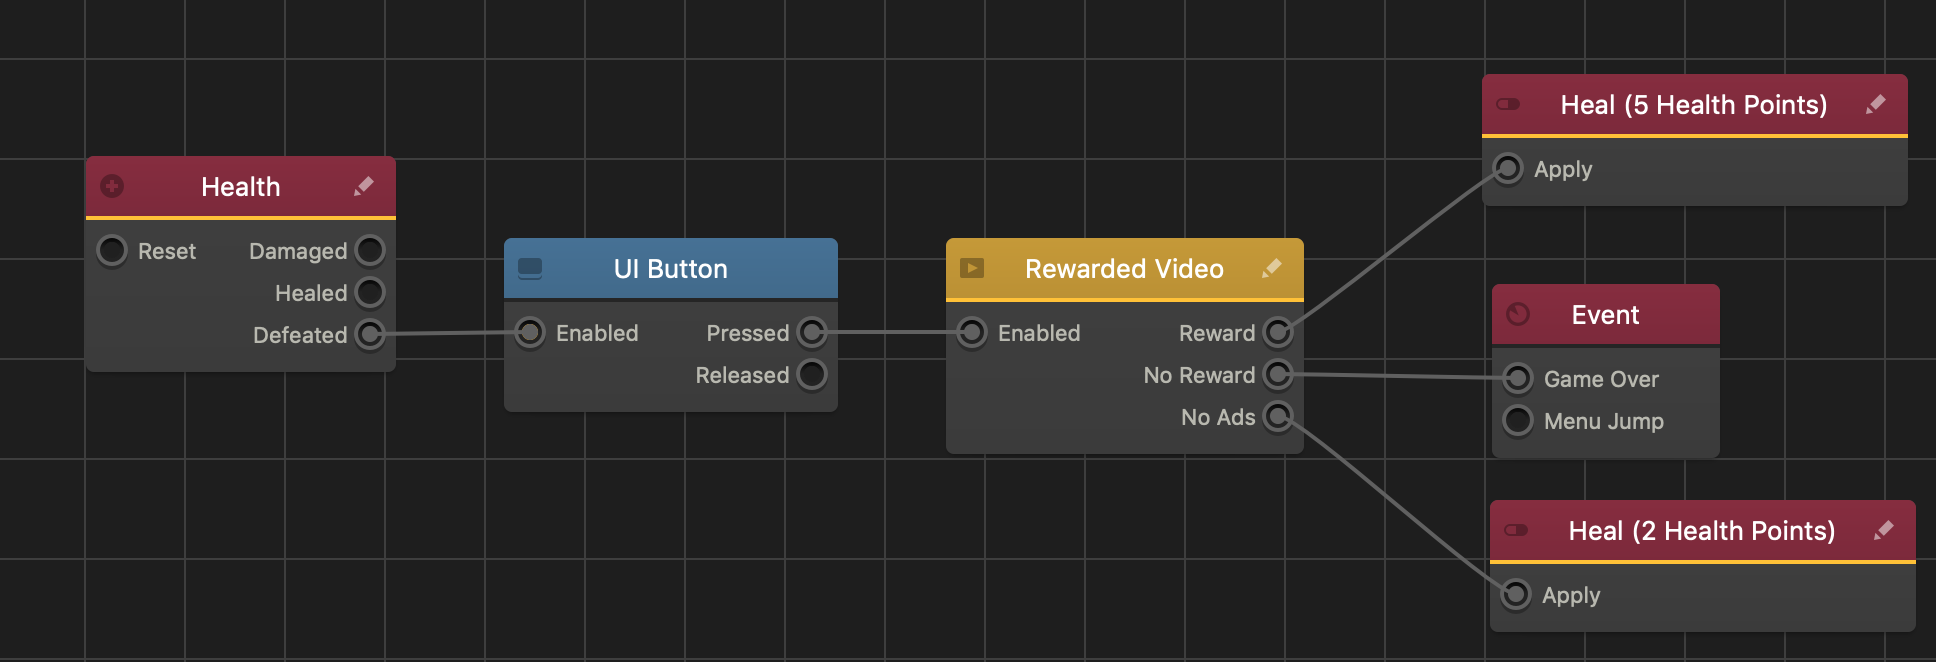
For example, when the player runs out of health, they can watch a rewarded video to gain more health and continue playing.

To accomplish this, connect the UI Button node to the Rewarded Video node and connect its outputs as follows:

  1. Connect the Reward output to any nodes that you want to reward the player with once the video is finished playing.
    For example, connect this output to a Heal node to reward the players with more health after they watch the video.
  2. Connect the No Reward output to any nodes that will activate when the player decides to skip the video.
    If left unconnected, the game will continue as normal.
    For example, connect this output to the Game Over input of an Event Observer node to bring them to the Game Over screen if they decide to skip the video.
  3. Connect the No Ads output to any nodes that will activate when the video stops playing due to technical issues (Wi-Fi stops working, phone shuts off).
    If left unconnected, the game will continue as normal.
    For example, connect this output to another Heal node that rewards less health for not finishing the entire video.

Note: You can add banner and interstitial ads to the UI nodes in the respective Options panels and the game Start node.

Purchase

Processes a purchase using a bundle ID. Once the purchase is successful, any nodes connected to the “End” output will be activated.

Important: The Purchase Node is only available for Buildbox Plus and Pro users.

Option Description
Name Type a custom name for this node, if needed.
Store Identifier Type the bundle ID for the purchase.

Back to Top

Action Nodes – Buildbox 3 Manual

By |

Action Nodes

Action nodes are used to make assets perform specific functionalities

For details on how to add an action node to a character or object in a game, see Adding, Editing, and Deleting Nodes.

Node Icon Description Customizable?
If Collide Creates a Collision Shape that triggers a reaction when a physics based object makes contact. No
Switch Alternates between two different outputs when activated. When output A is activated, output B will be the next output to be activated. Yes
Event Creates an Event within a World that can take the player to a different UI or world screen. No
Spawn Creates a specified asset in the scene at the current asset’s location. Yes
Defeat Removes the asset from the world while activating any attached nodes. Yes
Set Visibility Shows or hides all of the asset’s 3D models and images. Yes
Set Color Applies a color overlay to any 3D model or image in the asset. Yes
Set Random Color Applies a random color as an overlay to an asset that has a 3D Model node or an Animation Node. Yes
Set Background Color Changes the color of the world background. Yes
Camera Shake Applies a continuous shake to the camera. Yes
Camera FOV Animation Changes the camera’s field of view over time. Yes
Camera Position Animation Moves the camera in the direction specified by the axis values over time. Yes
Camera Rotation Animation Rotates the camera in a direction specified by the axis values over time. Yes
Camera Zoom Animation Sets the camera zoom amount over time. Yes
Position Limiter Keeps the asset position contained within a boundary specified by the minimum and maximum axis values. Yes
Position Animation Changes the asset position over time. Distance and direction specified in the axis fields. Yes
Rotation Animation Rotates an asset over time. Amount specified in the axis fields. Yes
Rotate Towards Rotates an asset to face the camera or another specified asset. Yes
Scale Animation Changes the asset size over time. Amount specified in the axis fields. Yes
Color Animation Changes the asset color over time.
Modify Timer Modifies the amount of time remaining in a Timer node. Yes
Timer Enables a number of seconds to be counted down before the Timeout output can activate another node. Yes
Set Ui Text Changes the text on a specified UI Label.
Wake Up Activates any attached nodes when a character comes within the specified distance. Yes
Add Point Increases the point score type by a specified amount. For details on how to display your score by score type, see Adding Score. Yes
Reset Resets the specified point score back to 0. Yes
Play Animation Plays the scene animation of the asset. Yes
Health Gives the asset Hit Points, or a health amount that determines when an asset is defeated. Also determines what happens when an asset has been damaged, healed and defeated. Yes
Damage Applies damage to this asset or one it collides with by subtracting from a Health amount specified by a Health Node. Yes
Heal Heals this asset or one it collides with by adding to a Health amount specified by a Health Node. Yes
Set Time Warp Changes the game speed. Yes
Random Activates one of its outputs at random based on a 0-1 numeric value. Yes
Random 5 Activates one of five connected nodes at random. Yes
Set Physics Changes the physics settings on an asset. This will override the physics settings on the start node. Yes
Send The Send nodes create a special kind of event for the Receive nodes to use and activate any connected nodes on a different asset. Yes
Receive
Debris Explosion Spawns multiple specified assets as debris in a burst outward from the center of the attached asset. Yes
Slingshot Launches a projectile in a given direction based on how far back the player pulls and aims the asset. Yes
Set Checkpoint Stores the current progress of the game or app. Yes
Load Checkpoint Loads the progress of the last checkpoint that was set in the game or app. Yes
Attract Makes the attached asset move towards another asset specified by an If Collide node. Yes
Haptic Feedback Activates a low or high vibration level on a mobile device. Yes

Movement Nodes – Buildbox 3 Manual

By |

Movement Nodes

These nodes apply different types movement or motion to an asset that they are attached to. See also Making Characters Jump and Objects Move.

For details on how to add a movement node to a character or object in a game, see Adding, Editing, and Deleting Nodes.

Node Icon Description Customizable?
Move Allows the asset to travel in the direction specified in the axis values. Yes
Jump Launches a Dynamic asset into a direction that is defined in the axis values. Yes
Set Scene Speed Changes the scene’s path speed. Yes
Motor Propels a hinge linker object forward. Yes
Path Move Allows the asset to move forward on a continuous path in the direction of the End Point. Yes
Float Allows the player to keep an asset afloat before and prevent it from falling to ground level. Yes
Rotate Allows the asset to rotate along the specified axes. Yes
Bounce Applies a continuous bouncing motion to an asset. Yes
Wave Applies a continuous wave motion pattern that shifts an asset into the specified direction then returns it to the point of origin at a consistent speed. Yes
Move In Direction Moves an asset in the direction specified by a UI Joystick asset in a UI screen. Yes
Glue Allows a dynamic asset to stick to another asset when they collide, and can only connect to the If Collide node. Yes
Gravitate Allows a dynamic asset to move and gravitate toward character assets. Yes
Velocity Drag Applies physics resistance to a dynamic asset’s movement and rotation. Yes
Speedometer Changes the text on a specified UI Label. Yes

Control Nodes – Buildbox 3 Manual

By |

Control Nodes

These nodes allow you to attach a variety of controls to your asset, such as touch, swipe, keyboard buttons, and mouse controls.

For details on how to add a control node to a character or object in a game, see Adding, Editing, and Deleting Nodes.

Node  Icon Description Customizable?
Touch  Enables any connected nodes when the entire screen is activated by either the touch or release of a finger, or the click or release of the mouse. No
Touch Move Allows the player to change the position of the asset by dragging it across the screen with either a finger or mouse. Yes
Touch Rotate Allows the player to change the rotation of the asset by dragging it across the screen with either a finger or mouse. Yes
Is Touched Activates any connected nodes immediately when the player clicks or taps the screen. Yes
Touch Path Puts the asset on a continuous path moving forward, and allows the asset to be moved from side to side by dragging left or right across the screen using a finger or mouse. Yes
4-Way Swipe Allows the player to drag the screen in 4 directions, up, down, left, and right. Yes
UI Button Allows the player to click or tap a specified area on the screen to activate any connected nodes. No
Keyboard Button Assigns a button on the keyboard to activate any connected nodes. No
Keyboard Move Allows the WASD and Arrow keyboard buttons to enable any connected nodes. No
Mouse Button Assigns a Mouse Button that will activate any connected nodes. No
Mouse Move Allows the movement of the mouse to enable any connected nodes. No
Mouse Scroll Allows the scroll wheel of the mouse to enable any connected nodes. No

Content Nodes – Buildbox 3 Manual

By |

Content Nodes

These nodes allow you to define the shape of the selected object or character and add special effects, such as animation, sounds, text, and so on.

For details on how to add a content node to a character or object in a game, see Adding, Editing, and Deleting Nodes.

Node  Icon Description Customizable?
3D Model Defines a 3D mesh that provides a shape to a character or object. No
Animation Creates a 2D plane that plays a PNG sequence or displays an image. No
8 Side Animation Changes an asset’s 2D animation based on the asset’s direction of movement or the direction it faces in a 3D World. Yes
Sound Plays an MP3 file. No
Label Allows you to display text inside an asset. No
Trail Creates a trail that traces along the asset’s movement path in a scene. No
Trail 3D Spawns multiple specified assets that follow behind the controlling asset in a trail. Yes
Billboard Icon Shows an image that will always face the camera. No
Sub Scene Contains a 3D mesh with a skeleton that can be animated by a Keyframe Animation node. No
Keyframe Animation Plays a 3D animation for a connected Sub Scene node. No

Steam Store Settings – Buildbox 3 Manual

By |

Steam Store Settings

The settings below are part of the General Project Settings that you need to define when exporting your game.

Setting Description
Application Store Select Steam Store.
Bundle ID Enter a unique identifier to be embedded into the app, typically using the following format:

com.short-company-name.short-game-name.

Name on Device Enter a short name to be displayed on the device after the game is installed on it.

This name will appear under the game icon.

If it’s too long to display, the device abbreviate it by adding a trailing ellipsis (…).
Leaderboard ID Enter the code-name of the leaderboard, which you set up on the Game Admin page of the Steamworks partner site, or via the API, so the game can use it. If needed, see Steam Leaderboards.
Review Link Enter a link in the App Store that the player can use to provide a review of your game.
Share Message Enter a message to prompt the player to share the game.

Make sure to include a link to your game in the App Store or Play Store.

If you are publishing your game on multiple platforms, consider making this link open web pages instead of an App Store. This will ensure that people with whom the player is sharing the game can access your game from different kinds of devices.

If you want to show the player’s score in this message you can insert the [[SCORE]] tag into your text.

Steam App ID Enter the unique numeric App ID provided for your submission on Steam, which may look like 538728.

Google Play Store Settings – Buildbox 3 Manual

By |

Google Play Store Settings

The settings below are part of the General Project Settings that you need to define when exporting your game.

Setting Description
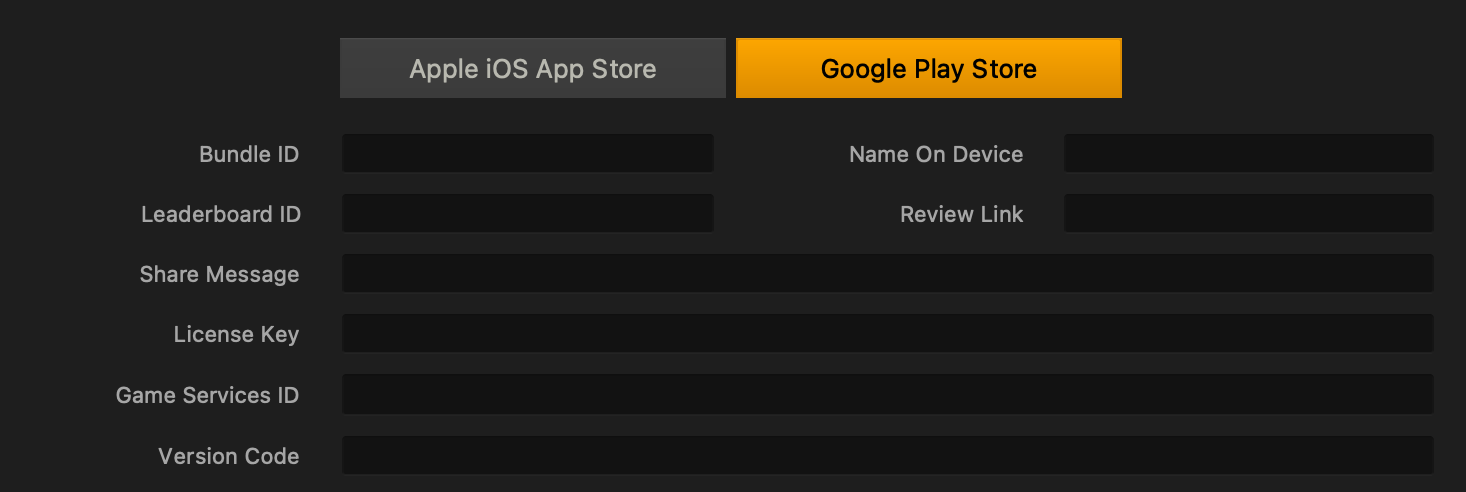
Bundle ID Enter a unique identifier to be embedded into the app, typically using the following format:

com.short-company-name.short-game-name.

Name on Device Enter a short name to be displayed on the device after the game is installed on it.

This name will appear under the game icon.

If it’s too long to display, the device abbreviate it by adding a trailing ellipsis (…).
Leaderboard ID Enter the code-name of the leaderboard, which you set up in Play Developer Console so the game can use it.
Review Link Enter a link in the App Store that the player can use to provide a review of your game.
Share Message Enter a message to prompt the player to share the game.

Make sure to include a link to your game in the App Store or Play Store.

If you are publishing your game on multiple platforms, consider making this link open web pages instead of an App Store. This will ensure that people with whom the player is sharing the game can access your game from different kinds of devices.

If you want to show the player’s score in this message you can insert the [[SCORE]] tag into your text.

License Key Enter the license key for your game provided by the Google Play Store.
Game Services ID Enter your Project ID to connect to Google Play Games Services such as leaderboards and achievements. Here is how to find your Project ID, and there’s a guide on setting up Google Play Games Services here.
Version Code Required: Enter a positive number for use as an internal version for your game. Increment this number when exporting a new version of your game. More info here.