Health, Damage, and Defeat – Buildbox 3 Manual

By |

Manage Health, Damage, and Defeat

Health, or Hit Points, determines how much damage a character or enemy can sustain before it is defeated. Damage is the number that is subtracted from the health when the character or object collides with an enemy. After its health is depleted (reaches 0), the object or character is defeated and should be removed from the game.

Adding Health

To add health to an asset:

  1. On the Mind Map, double-click the World node where you want to add health to an asset.
  2. Inside the World, in the Asset panel on the left, double-click the asset to open its Node Map
  3. In the Node panel of the Node Map workspace, click Actions to expand the list.
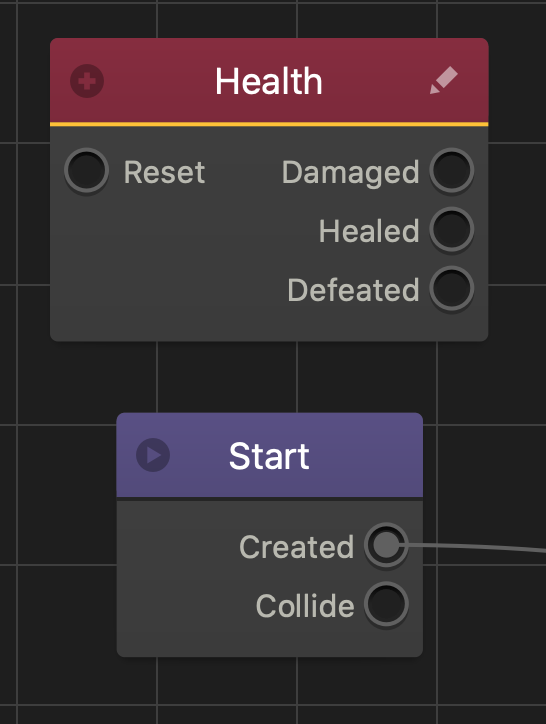
  4. Drag the Health node to the Node Map grid.
    The Health node does not need to connect to the Start node.
  5. Click the Health node and in the Options panel on the right, in the Health field, enter the number of hit points for the asset. For details, see Health Node.

Now you need to specify the amount of damage to be applied to the character.

Defining Damage

To apply damage to an asset when it collides with an enemy:

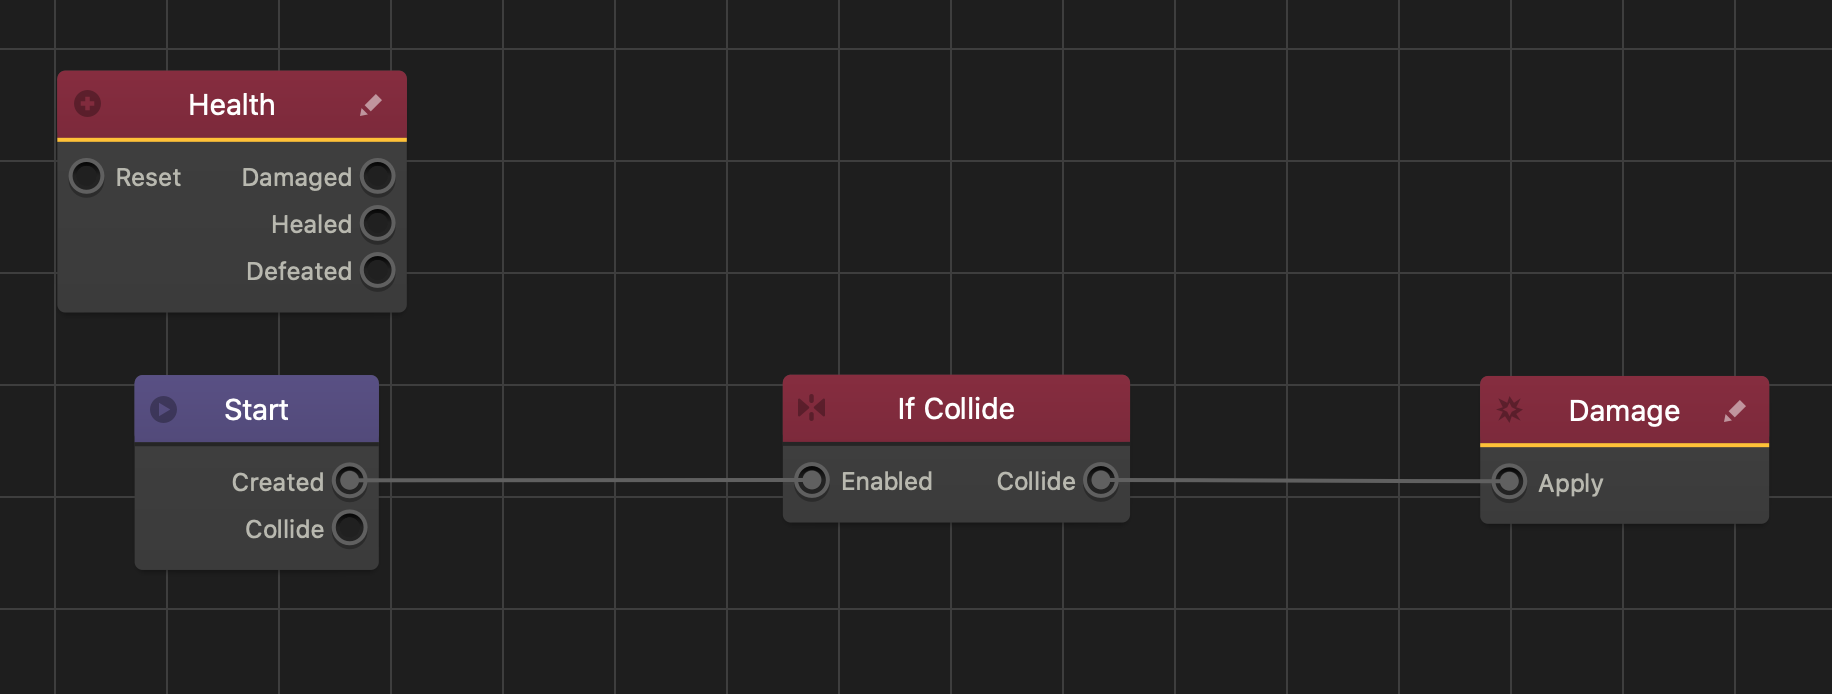
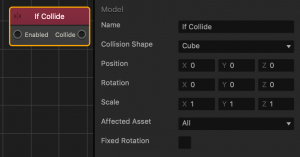
  1. In the Node panel, search for the If Collide node and drag it to the Node Map.
  2. On the Start node, click the Created output and drag a connector to the Enabled input of the If Collide node.
  3. Click the If Collide node and in the Options panel on the right, in the Affected Assets drop-down list, select Enemy.
  4. In the Node panel, search for Damage, and drag it to the Node Map.
  5. On the If Collide node, click the Collide output and drag a connecter to the Enabled input of the Damage node.
  6. To change the damage amount, click the Damage node, and in the Options panel on the right, enter a numeric value to specify the Damage amount to be applied. For more details, see Damage Node.

Now you need to specify what happens when the character’s health is depleted.

Handling Defeat

To make a character or object defeated after its health reaches 0:

  1. In the Node panel, click Actions category, scroll to the Defeat node and drag it to the Node Map.
  2. On the Health node, click the Defeat output and drag a connector to the Enabled input of the Defeat node.

You’ve defined the amount of health our asset can have and the amount of damage it can sustain. Once defeated, it will be removed from the game.

4-Way Swipe Node – Buildbox 3 Manual

By |

4-Way Swipe Node

This control node allows the player to drag the screen in four directions.

Option Description
Name Type a custom name for this node, if needed.
Drag Length Enter the maximum distance across the screen that the players will be allowed to drag.

If needed, you can also customize this node. For details, see Customizing Nodes.

Touch Path Node – Buildbox 3 Manual

By |

Touch Path Node

This control node puts the asset on a continuous path moving forward, and allows the asset to be moved from side to side by dragging left or right across the screen using a finger or mouse.

Option Description
Name Type a custom name for this node, if needed.
Speed The speed or rate the object will travel forward.The higher the value, the faster the object will travel forward.
Sensitivity Determines how much the user has to drag across the screen to move the object. The higher the value, the less the user has to drag across the screen to move the object.

If needed, you can also customize this node. For details, see Customizing Nodes.

Is Touched Node – Buildbox 3 Manual

By |

Is Touched Node

This control node activates at the precise moment when the user clicks the screen with a mouse or touches the screen with a finger.

Option Description
Name Type a custom name for this node, if needed.
Mode
  • AABB—Axis Aligned Bounding Box refers to the invisible bounding box on the screen that surrounds the asset and allows players to tap or click to activate the Touched output.
  • Raycast—allows the player to tap or click the asset’s collision shape to activate the Touched output.
Send On Click Select to allow the player to click or tap the asset.
Send On Move Select to allow the player to drag across the screen and over the asset.

If needed, you can also customize this node. For details, see Customizing Nodes.

Touch Rotate Node – Buildbox 3 Manual

By |

Touch Rotate Node

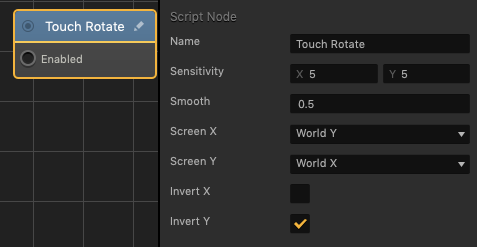
This control node allows the player to change the rotation of the asset by dragging a finger or mouse across the screen.

Option Description
Name Type a custom name for this node, if needed.
Sensitivity How fast or slow the asset will rotate. The higher is the value, the faster is the rotation. To affect the sensitivity along:

  • The horizontal axis, enter a value in the X axis.
  • The vertical axis, enter a value in the Y axis.
Smooth Enter a decimal from 0 to 1 to determine how smooth the rotation will be, 1 being 100%.
Screen X Select an axis of the World that will be affected when the screen is dragged along the horizontal axis.
Scale Y Select an axis of the World that will be affected when the screen is dragged along the vertical axis.
Invert X Select this checkbox to invert how the asset is rotated along the horizontal axis.
Invert Y Select this checkbox to invert how the asset is rotated along the vertical axis.

If needed, you can also customize this node. For details, see Customizing Nodes.

Touch Move Node – Buildbox 3 Manual

By |

Touch Move Node

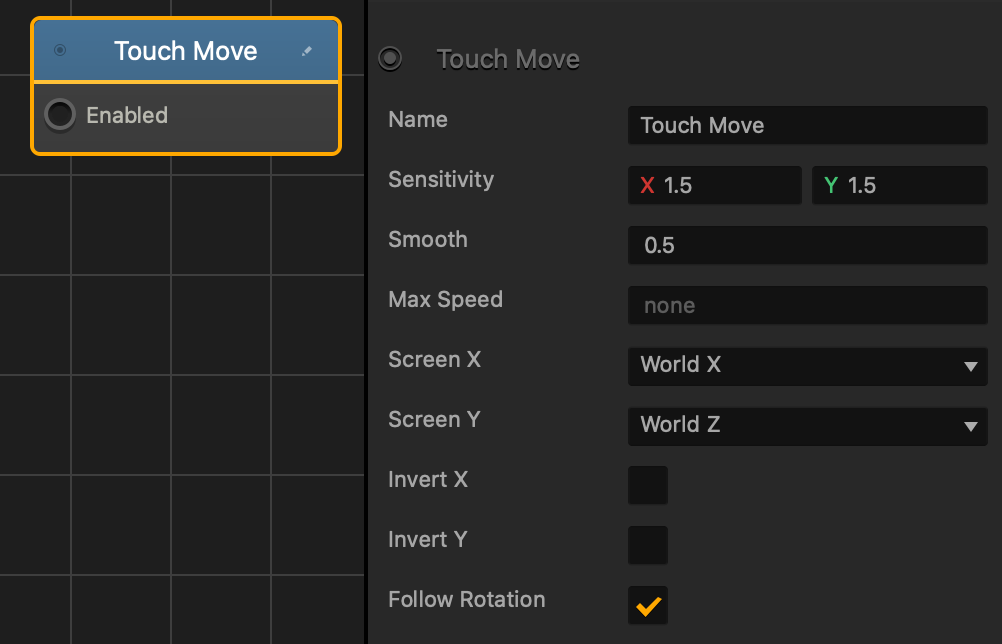
This control node allows the player to change the position of the asset by dragging it across the screen with either a finger or mouse.

Option Description
Name Type a custom name for this node, if needed.
Sensitivity How fast or slow the asset will move. The higher is the value, the faster is the movement. To affect the sensitivity along:

  • The horizontal axis, enter a value in the X axis.
  • The vertical axis, enter a value in the Y axis.
Smooth Enter a decimal from 0 to 1 to determine how smooth the movement will be, 1 being 100%.
Max Speed
  • Enter a numeric value to determine the maximum possible speed for the asset.
  • For example, if the X and Y axis fields contain values of 5 and the Max Speed is set to 3, then the asset will only move at a speed of 3.
Screen X Select an axis of the World that will be affected when the screen is dragged along the horizontal axis.
Scale Y Select an axis of the World that will be affected when the screen is dragged along the vertical axis.
Invert X Select to invert how the asset is moved along the horizontal axis.
Invert Y Select to invert how the asset is moved along the vertical axis.
Follow Rotation Select  to make the asset always move in the direction that it’s facing.

If needed, you can also customize this node. For details, see Customizing Nodes.

Unlock Logic – Buildbox 3 Manual

By |

Unlock Logic Asset

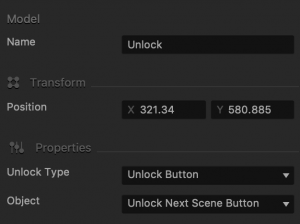
This UI node asset is used in conjunction with the Lock button that has its Unlock attribute set to Default. The Unlock asset is located in the Logic section of the Asset panel in the UI node workspace. For attribute details, see the table below.

Option Description
Name Enter a custom name for the asset if needed.
Position Enter a numeric value for each axis to specify the location of the Unlock asset.

Alternatively, drag the icon directly in the UI Editor and position it in the desired location.
Unlock Type Currently, only Unlock Button is supported.
Object Select what to unlock:

  • Unlock Next Scene Button—unlock the next scene, without having to configure an Unlock logic for each button.
  • Unlock Current Scene Button—unlock the current scene, without having to configure an Unlock logic for each button.
  • Lock Button—select which Lock button you want to unlock.

Event Observer – Buildbox 3 Manual

By |

Event Observer

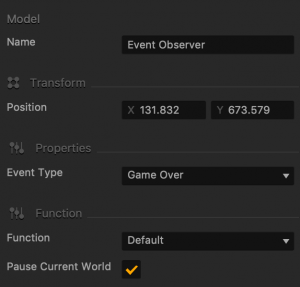
Event Observer is an asset that is typically used in a Game UI overlay to watch and respond to game events and user actions by loading another World or displaying another UI screen.

It is located in the Logic section of the Asset panel in the UI node workspace. For details on adding an Event Observer to the UI, see Add Event Observer. For attribute details, see the table below.

There’s also an Event Observer node that you can add to individual assets in the game.

Event Observer Attributes

When you select the Event Observer in the UI Editor, its attributes appear in the Options panel on the right.

Option Description
Name Enter a custom name for the Event Observer that reflects the type of events that would trigger its response, for example, Game Over.

This name will be displayed in the Outliner and on the output in the corresponding UI node on the Mind Map.

Position Enter a numeric value for each axis to specify the location of the Event Observer icon.

Alternatively, drag the icon directly in the UI Editor and position it in the desired location, typically outside the UI screen.
Event Type Select an event that should trigger a response from the Event Observer:

Game Over The player’s game session is over.
Session Points The player has collected the required number of points during the session.
Session Coins The player has collected the required number of coins during the session.
Total Points The player has collected the required total number of points throughout the game.
Best Points The player has collected the required number of best points.
Best Coins The player has collected the required number of best coins.
Last Scene The player has reached the last scene in the current World.
Redirect Moves the user to another World or UI based after the user plays the current UI the number of times specified in the Plays Before Redirect field below.
Request Review Requests a game review on mobile devices after the user plays the current UI the number of times specified in the Plays Before Redirect field below.
Time Out The player has been inactive during a game session for a specified period of time.
Make sure to connect the Event Observer to the appropriate World or UI on the Mind Map.
Session Total This field appears if an event having to do with points or coins is selected in the Event Type field.

Enter the number of points or coins that the player must collect to trigger the Event Observer.

Plays Before Redirect Enter the number of times the player can play before being redirected to the next UI or World or presented with a game review request. See the Redirect and Request Review options in the Event Type list above.
Time Enter the time (in seconds) of inactivity during the game after which the Time Out event is triggered.
Function Select how the new World or UI screen should be loaded when the selected event occurs and the Event observer is triggered:

  • Default—load World or UI at the beginning.
  • Start Checkpoint—load World at the point where a player may restart if their character is killed or they lose the game.
Pause Current World Select to pause the current world when the selected event occurs and the Event Observer is triggered.

Make sure to provide a button or another option in the UI to let the user resume the game.

UI Outliner – Buildbox 3 Manual

By |

 UI Outliner

The Outliner panel in the UI workspace provides an outline of the contents of the selected UI. It lists all the assets you have in the current UI, which may include UI elements like buttons, logic, and text labels.
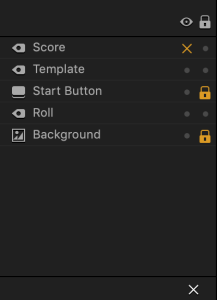
You can lock, hide, add, or delete items in the current UI by making the corresponding selections for each item in the Outliner.

Here’s what you can do in the Outliner:

  • To see the properties of an object, select it in the Outliner and view or edit them in the Options panel.
  • To hide an asset from the scene, click the option in the Show/Hide column.
    The asset will be marked with an x next to it. You won’t be able to see, move, or edit the asset while it’s hidden.
  • To lock an asset’s current position in the scene to avoid accidentally selecting, moving, or deleting it while you edit your scene, click the option in the Lock column.
    The asset will be marked with a lock next to it.
  • To delete an asset, select it in the Outliner and click the X button at the bottom or press the Delete key.
  • To add an asset to the Outliner, drag the asset from the Asset Panel.
  • To rename a newly added asset, for example, a text label, select it in the Outliner and enter a new name in the Options panel.

If Collide Node – Buildbox 3 Manual

By |

If Collide Node

This action node creates a Collision Shape that triggers a reaction when a physics based object makes contact. For a use case example, see Health, Damage, and Defeat.


Option Description
Name To create a custom name, replace “3D model” and type another name.
Collision Shape Select the type of shape for the area around the asset that other assets will collide with to trigger the desired outcome.
Position Move the collision shape around the asset by changing the axes values.
Texture Offset Move the texture along the axes by entering different X and Y axis values.
Rotation Rotate the collision shape by entering different axes values.
Scale Change the size of the collision shape by entering different axes values.
Affected Asset Select which asset or type of asset triggers the desired outcome.
Fixed Rotation Prevents the asset from rotating the collision shape despite the asset being rotated in the scene.