Switch Node – Buildbox 3 Manual

By |

Switch Node

This action node alternates between two different outputs when activated. When the signal from output A is true, output B will be false.

Option Description
Name Type a custom name for this node, if needed.
Emit on Start Select to make Output A becomes active when the asset is created or spawned in the game.

If needed, you can also customize this node. For details, see Customizing Nodes.

Wave Node – Buildbox 3 Manual

By |

Wave Node

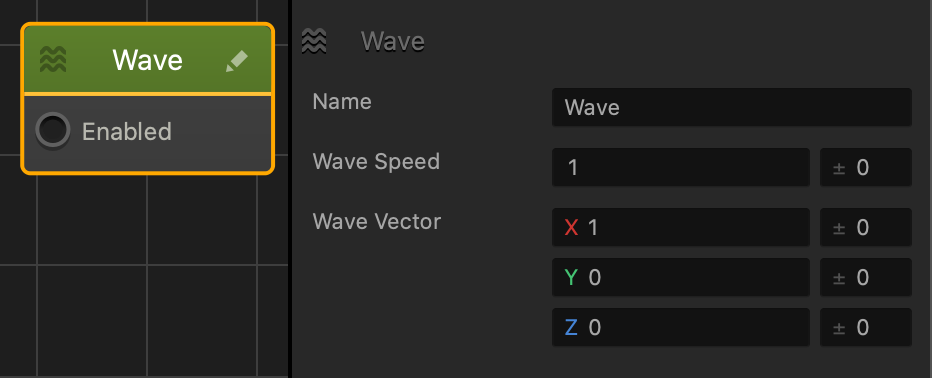
This movement node applies a continuous wave motion to the asset, which shifts in the specified direction and then returns to the point of origin at a consistent speed.

Name Creates a custom name for this specific node.
Wave Speed Enter a numeric value to specify the rate of motion. A higher number will result in the asset moving faster along each axis.

Enter a value in any of the range fields on the right to make the asset pick a random value.

  • The range value is both added and subtracted to create a minimum and maximum of possible outcomes.
  • For example, if you enter a value of 100 in the Wave Speed field and 50 in its range value field, a value between 50 and 150 will be selected during gameplay.
    |50———-100———-150|
Wave Vector Enter numeric values to specify the motion direction and distance along the axes.

Enter a value in any of the range fields on the right to make the asset pick a random value.

If needed, you can also customize this node. For details, see Customizing Nodes.

Bounce Node – Buildbox 3 Manual

By |

Bounce Node

This movement node quickly moves an asset into the specified direction, and once the asset reaches the specified height as determined by the Bounce Force, it will fall back to its starting point.

Option Description
Name Type a custom name for this node, if needed.
Bounce Force Enter a numeric value in the desired axis fields to specify the direction and distance the asset will bounce. For example, a value of 5 for the Y axis will result in the asset bouncing up vertically.
Bounce Level Enter a numeric value to specify the height that the asset must be under in order to bounce again.
If the asset is above this value, it will not be able to bounce again until it falls back under this value.

If needed, you can also customize this node. For details, see Customizing Nodes.

Rotate Node – Buildbox 3 Manual

By |

Rotate Node

This movement node allows the asset to rotate along the specified axis.

Option Description
Name Type a custom name for this node, if needed.
Speed
  • Enter a numeric value in any of the axis fields to represent the rotation direction and speed.
  • The greater the number, the faster the asset will rotate.
  • To make the asset rotate clockwise along an axis, enter a (+) positive value in the desired Speed axis field.
  • To make the asset rotate counter clockwise along an axis, enter a (-) negative value in the desired Speed axis field.
  • Also depends on which direction the game camera is facing.
  • If you put values in more than one axis, the asset will rotate in all of the specified axis directions
    • For example, if all of the axis fields contain values, the asset will rotate like that of a mechanical bull.
  • Creating a value range:
    • To make the asset pick a random axis value, enter a value in any of the range fields to the right.
    • The range value is both added and subtracted to create a minimum and maximum of possible outcomes.
    • For example, if you enter a value of 100 in the Y axis, a value between 50 and 150 will be selected during gameplay.
      |50———-100———-150|
If there is no value in an axis field, then other nodes can affect this asset in those axes. This is useful when adding a Jump node to an asset.

If needed, you can also customize this node. For details, see Customizing Nodes.

See also, Rotate Brainbox.

Float Node – Buildbox 3 Manual

By |

Float Node

This movement node allows the player to keep an asset afloat before and prevent it from falling to ground level.

When this node is enabled, the asset will begin to fall until it reached 0 in the Y axis of the scene. To allow players to move the asset up and keep it afloat, connect the desired node to the Up input.
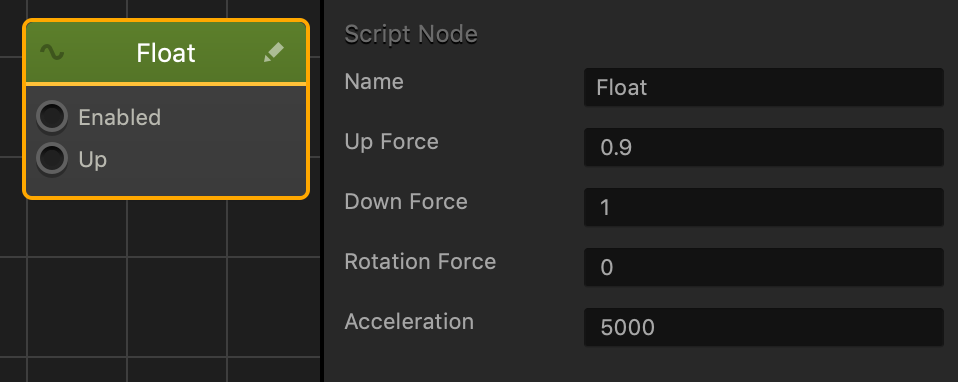
Option Description
Name Type a custom name for this node, if needed.
Up Force Enter a numeric value to determine how far the player can make the asset move up.
Down Force Enter a numeric value to determine how fast the asset will move down to ground level.
Rotation Force Enter the degree amount to determine how much the asset rotates when moving up and down.
Acceleration Enter a numeric value to determine how quickly the asset will move up.

If needed, you can also customize this node. For details, see Customizing Nodes.

Path Jump Node – Buildbox 3 Manual

By |

Path Jump Node

This movement node allows the asset to jump while moving forward on a continuous path in the direction of the End Point. See also Making Characters Jump and Objects Move.

Option Description
Name Type a custom name for this node, if needed.
Speed The speed or rate the object will travel forward.The higher the value, the faster the object will travel forward.
Position Changes the default horizontal position of the asset according to the path set by the Start/End Points. A value greater than 0 will shift the asset to the right, while a value less than 0 will shift the object to the left.
Height Enter a numeric value to specify the jump height of the asset.

If needed, you can also customize this node. For details, see Customizing Nodes.

Path Move Node – Buildbox 3 Manual

By |

Path Move Node

This movement node allows the asset to move forward on a continuous path in the direction of the End Point.

IMPORTANT: This node will not work on an asset with Dynamic physics enabled.

Option Description
Name Type a custom name for this node, if needed.
Speed The speed or rate the object will travel forward.The higher the value, the faster the object will travel forward.
Position Changes the default horizontal position of the asset according to the path set by the Start/End Points. A value greater than 0 will shift the asset to the right, while a value less than 0 will shift the object to the left.

If needed, you can also customize this node. For details, see Customizing Nodes.

Motor Node – Buildbox 3 Manual

By |

Motor Node

This movement node propels a hinge linker forward.

Option Description
Name Type a custom name for this node, if needed.
Linker Name Enter the name of a linker.
Max Motor Impulse Enter the amount of force you want to propel the linker.
Motor Velocity Enter the amount of speed the linker will have after it has been propelled

If needed, you can also customize this node. For details, see Customizing Nodes.
Jump Node – Buildbox 3 Manual

By |

Jump Node

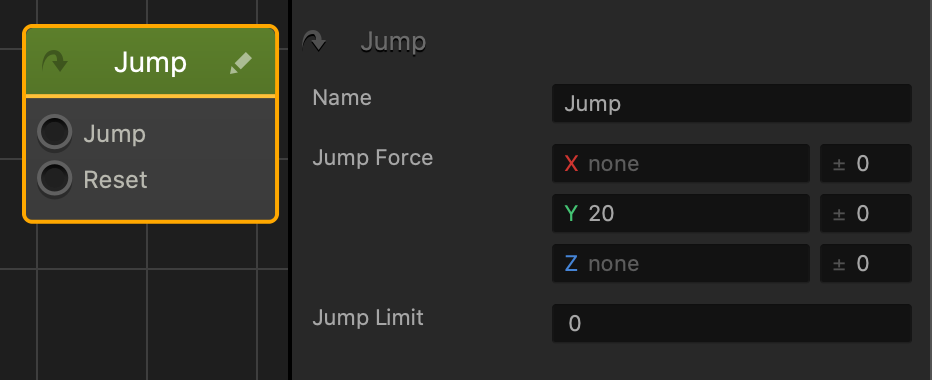
This movement node launches a dynamic asset in a specified direction. See also Making Characters Jump.

This node requires the asset’s physics to be set to Dynamic.

Option Description
Name Type a custom name for this node, if needed.
Jump Force
  • Enter a numeric positive value in the axis field to change the jump height of the asset.
  • Enter a numeric value in the X and Z axis fields to launch the asset in a specified direction.
  • To make the Jump Force not affect a direction, delete the value in the axis fields until it displays none.
  • Range values
    • Enter a value in any of the range fields on the right to make the asset pick a random axis value.
    • The range value is both added and subtracted to create a minimum and maximum of possible outcomes.
    • For example, if you enter a value of 100 in the Y axis field and 50 in its range value field, a value between 50 and 150 will be selected during gameplay.
      |50———-100———-150|
Jump Limit Enter the amount of times an asset is allowed to jump.

The Reset input will reset the amount of times this asset has jumped.

If needed, you can also customize this node. For details, see Customizing Nodes.

Move Node – Buildbox 3 Manual

By |

Move Node

Allows the asset to travel in the direction specified in the axes values.

Name Creates a custom name for this specific node.
Speed To increase the speed or change the movement direction, enter different values in the axes fields.
NOTE: If there is no value in an axis field, then other nodes can affect this asset in those axes. Useful when also applying a Jump Node to an asset.
Follow Rotation To make the asset always face the direction it is moving, select this option.