Random 5 Node – Buildbox 3 Manual

By |

Random 5 Node

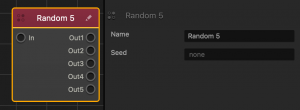
This action node activates one of its 5 outputs at random.

Option Description
Name Type a custom name for this node, if needed.
Seed A seed is a category of possible outcomes. Enter a numeric value to make the same combination happen every time the game is loaded.

If needed, you can also customize this node. For details, see Customizing Nodes.

Random Node – Buildbox 3 Manual

By |

Random Node

This action node activates one of its outputs at random based on a 0-1 numeric value.

Option Description
Name Type a custom name for this node, if needed.
Threshold Enter a numeric value with a minimum of 0 and a maximum of 1 to specify how often the Over and Under output activates

  • A higher value will increase the odds of the Over input activating
  • The lower value will increase the odds of the Under Input activating.

If needed, you can also customize this node. For details, see Customizing Nodes.

Play Animation Node – Buildbox 3 Manual

By |

Play Animation Node

This action node plays the scene animation of the asset.

  • If the asset has been animated in a scene via the Scene Animation Editor, then this node will play that animation.
  • If the asset has not been animated using the Scene Animation Editor, then this node will not have an animation to play.


Option Description
Name Type a custom name for this node, if needed.

If needed, you can also customize this node. For details, see Customizing Nodes.

Camera FOV Node – Buildbox 3 Manual

By |

Camera FOV Animation Node

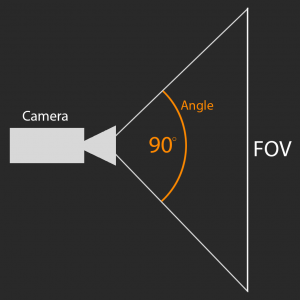
This action node changes how much of the game world the camera can see measuring by the angle.

The image below demonstrates how the angle measures the FOV:

Option Description
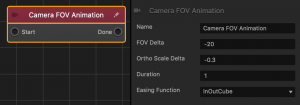
Name Type a custom name for this node, if needed.
FOV Delta A numeric value that is added to the camera’s current angle over a specified time.
Ortho Scale Delta A numeric value that specifies how wide of a movement or rotation the shake will have over time, if the camera’s Projection is set to Orthogonal.
Duration The amount of time, in seconds that the FOV will be changed.
Single Launch If checked, the animation will only happen one time.
Easing Function Specifies the rate of change when the camera changes position.

  • For an ease in ease out pattern, select InOutCube.
  • For a straight and constant pattern, select linear.

If needed, you can also customize this node. For details, see Customizing Nodes.

Damage Node – Buildbox 3 Manual

By |

Damage Node

This action node applies damage to this asset or one it collides with by subtracting from the Health amount specified by a Health Node. For a use case example, see Health, Damage, and Defeat.

Option Description
Name Type a custom name for this node, if needed.
Amount The total Hit Points of an asset, and the amount of damage an asset can receive before being defeated.
Target Select where the damage will be applied.

  • Self: Damage will applied to this asset.
  • Sensor: Damage will be applied to assets specified by an If Collide node.
Sensor Name Type the name of an If Collide node to apply damage to assets specified by the If Collide node.

If needed, you can also customize this node. For details, see Customizing Nodes.

Health Node – Buildbox 3 Manual

By |

Health Node

This action node gives the asset Hit Points, or a health amount that determines when an asset is defeated. Also determines what happens when an asset has been damaged and defeated.

  • Health is the amount of damage an asset can receive before being defeated.
  • There is no need to connect this node to the Start node. When this node is attached to an asset, it will already be active.
  • Connecting a node to Reset will reset the health back to the specified amount.
  • When an asset receives damage from a Damage Node, the Damage amount set by the Damage node will be subtracted from the health amount.
  • When the Health amount has increased by any number, the asset is considered to be Healed.
  • When the Health amount has decreases by any number, the asset is considered to be Damaged.
  • Once the Health amount has reached 0, the asset is considered being Defeated.

Option Description
Name Type a custom name for this node, if needed.
Starting Health Enter a numeric value to specify the total Hit Points an asset contains at the start of the game.
Max health
  • Enter a numeric value to specify the number of maximum possible hit points the asset can have.
  • The asset will not be able to earn more Health from a Heal node when it has the maximum health amount.

If needed, you can also customize this node. For details, see Customizing Nodes.

Billboard Icon Node – Buildbox 3 Manual

By |

Billboard Icon Node

This content node shows an image that will always face the camera.

Option Description
Texture To apply an image to this node, drag an image from your computer into the field.
Position Axis values that changes the position of the image.
Scale Axis values that changes the size of the image.


Making Objects Move Naturally – Buildbox 3 Manual

By |

Make Objects Move Naturally in the Game

To create the effect of a natural movement, you need to use the gravity and physics settings in the World and in the Start node of individual objects. The physics settings in the World node also allow you to control “game speed,” or how fast or slow objects move in the game.

You may have to do some trial-and-error testing of your game (selecting Run > Preview) to find the optimal values for each settings that would create the desired effect.

To modify the gravity and physics settings:

  1. On the Mind Map, select the World node where you want to make the changes.
  2. In the World Options panel on the right, in the Gravity fields, enter the appropriate values for the X, Y, and Z axis attributes to specify the direction as well as the amount of force that gravity will be applied.
  3. To increase the game speed, increase the Time Warp and Sub Steps attributes values.
  4. Preview your game and make the necessary adjustments.
  5. Double-click the World node on the Mind Map.
  6. Inside the World, on the Asset panel, double-click the asset whose movement you want to make more natural.
  7. On its Node Map, select the Start node.
  8. In the Options panel on the right, click the Physics dropdown and select Dynamic.
  9. Preview and test your game.

See also Make Characters Jump or Objects Move and Set Time Warp Node.

Changing Background in Scenes – Buildbox 3 Manual

By |

Change Background Colors or Images in Scenes

Depending on your design, you can add a background to all scenes in a World or to individual scenes. You can use simple color backgrounds or images.

Changing scene background color

To change the background color of all scenes in a World:

  1. On the Mind Map, select the World node where you want to change the background.
  2. In the Options panel on the right, click Background Color.
  3. In the Colors window, select the color you need and click OK.
  4. To preview the color, select Run Preview on the Buildbox menu bar.

When you double-click the World node, the background in the Scene Editor will be the color you have chosen, for example, see the yellow background color shown in the image in World Workspace.

Adding background images

To add an image background to an individual scene or all scenes:

  1. On the Mind Map, double-click the World node where you want to change the background.
  2. In the Scene Selector at the bottom of the World workspace, click the scene where you want to change the background.
  3. Drag an image from your computer and hover it over the Scene Editor.
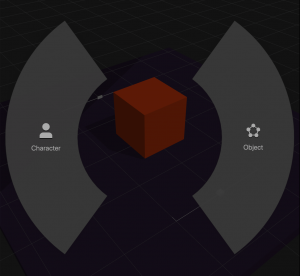
    A Drop Wheel appears with two sections for you to assign a category for the image.
  4. In the Drop Wheel, drag the image over the Object section on the right.
  5. On the Scene Editor toolbar, click the Camera button to get the camera view.
  6. On the Scene Editor toolbar, select the Move Tool and position the image in front of the camera to the desired location.
  7. Select the Scale Tool and resize the image so that if fills all or most of the screen.
    If needed, for details on using the tools, see Tools.
  8. To attach the background image to the camera so that it remains in place in all scenes, in the Outliner, find the name of your image and drag it over the Camera.
    The image now appears in the Camera drop-down list in the Outliner hierarchy.
  9. To preview the background, select Run Preview on the Buildbox menu bar.