Node Anatomy
Whether they are used on the Mind Map or Node Map, all nodes in Buildbox have the same overall layout.
Appearance
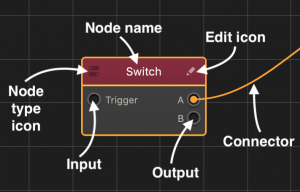
- All nodes have a colored title that indicates the category and at least an input or an output below.
- Aside from the colored background, each node title consists of two parts:
- A node icon in the top-left corner that indicates the type of the node in the same node category.
NOTE: This is the same icon that is displayed in the Node panel from which you can add nodes to the map, for example, for a Switch node shown above. This icon also appears under your mouse cursor when you drag a node from the Node panel to the Map.
 - The name of the node, which you can change in the respective Options panel, if necessary.
- A node icon in the top-left corner that indicates the type of the node in the same node category.
Customizability
Some nodes are customizable, which is indicated by the Edit icon in the top-right corner.
- In object or character nodes, clicking the icon allows you to customize their code by using JavaScript, add attributes, and/or modify inputs and outputs. For details, see Customizing Nodes.
- In World and UI nodes, it opens the respective World and UI workspaces where you can edit the nodes.
Functionality
Nodes must be connected, with each preceding node activating the next node to which it is connected. On the Mind Map, the connectors between World and UI nodes indicate the overall game flow. On the asset Node Map, the connectors between different nodes define the looks and behavior of the asset under specific conditions.
Node connections are made between node outputs and outputs. Here’s what you need to know about them:
- All nodes, except the Start nodes, have at least one input on the left.
- Some nodes may also have one or more outputs on the right.
- A node must have at least one connector linking its output to the input of another node.
- You may not link an output to another output and vice versa, only output to input.
- You can add multiple connectors from one output.
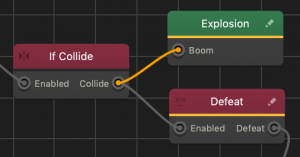
For example, to see how the If Collide and Defeat nodes are used, see Health, Damage, and Defeat.


